| simple_course_evaluation.xls | |
| The formatted spreadsheet | |
| simple_course_evaluation_raw.xls | |
| The spreadsheet without formatting | |
This tutorial shows you how to convert en Excel spreadsheet to a live, working calculator in your FrontPage site.
The Frontpage Extensions was formerly a Microsoft product, but has now been discontinued. However, the FrontPage Server Extensions (FPSE) 2002 for Windows Vista and Windows Server 2008 RTM is supported by Ready-to-Run Software. For support and servicing, contact Ready-to-Run Software, Inc.
You can download Frontpage Extensions for IIS 7.0 at http://www.iis.net/community/
In this article we’ll explain how to create an online survey form. We’ll build the form in Excel, then convert it to web format with SpreadsheetConverter. When the user submits the form, we’ll use the Frontpage Server Extensions to forward the survey response to an e-mail Inbox.
This example uses the Frontpage Extensions to send a survey form to an e-mail Inbox. If you want to, you can use SpreadsheetConverter’s own built-in form-to-Inbox support instead.
We’ll be happy to tell you a lot more about SpreadsheetConverter, our famous Excel-to-html web authoring product. Why not begin by sending us one of your own spreadsheets, and we’ll send it back as a web page? It’s free and it really shows you what we can do for you.
If you want to learn more about SpreadsheetConverter, we suggest you start at the beginning.
Web forms are commonly used to obtain information from users. Users fill in or select values for a series of questions and then, when they are satisfied with their answers, they click on a button to submit the information.
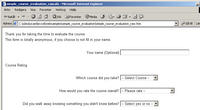
Here is the final web form that we’ll use in our survey.
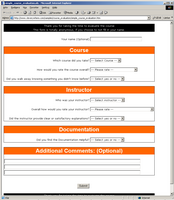
The final web page
The example survey form that we’ll be creating in this article allows users to provide feedback on a fictitious training course. Each time someone fills out the survey form and clicks on the ‘Submit’ button, the web page automatically generates and sends an email containing a summary of the users responses. To take a look at a finished version of the web page click here.
During this article we will be using the following software:
The article consists of 3 parts
The survey spreadsheet will consist of two columns that will be displayed on the resulting web page, one column containing the questions of the survey, and the other column containing the input cells for the user’s responses. Extra columns are also used in the example survey spreadsheet for the options that will be displayed in dropdown list boxes.
Note! The original survey spreadsheet contains no formulas. We do not need formulas for this example.
The raw spreadsheet without the formatting can be found here.
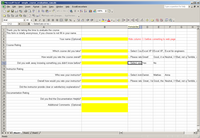
The raw spreadsheet before we added formatting
Both the headings and the questions that make up the survey form should be entered as text into the spreadsheet.
Use a new spreadsheet cell for each separate heading or question.
The cells that you want the user to use to enter their responses to the survey questions should all be marked by setting the background color to an arbitrary unique color. All cells must have the same color, for example in the survey spreadsheet we’ve used bright yellow.
Next, each of the marked response cells should be defined as input cells. The choice of which kind of input cell to use in each case will depend upon the format of the response required from the user. The three basic sorts of input cells are: Textbox cells, where the user enters a free text response; Dropdown list cells, providing a user with a list of choices; and Checkbox cells, allowing the user to select between two values (true/false). Instructions for adding each of these input cells can be found below:
For responses where the user will simply enter some text, no special action is required in the spreadsheet.
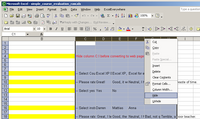
To create a Dropdown list input cell:
Tip: Add an extra element first in the list, so that you can recognize that the user didn’t select anything, for example, instead of having just the two options:
use three options instead:
In order to create a Checkbox input cell simply type the text ‘FALSE’ into a cell, and SpreadsheetConverter will create an unchecked checkbox.
The final step in creating the survey spreadsheet is to hide the areas of the spreadsheet that shouldn’t be visible on the webpage. This can be achieved simply:
Hide the columns
Now that we have created the survey spreadsheet the next step is to use SpreadsheetConverter to create a web page from the spreadsheet.
When SpreadsheetConverter is installed it adds an extra menu to Excel. The new menu is placed to the right of the Help menu:
Note! If you have paid for a SpreadsheetConverter license, the first page on the wizard is where you can enter the license key. If you do not have a key, you can test the program for 30 days. The only restriction is that only the first 20 rows of the spreadsheet will be visible on the web page, so everything that you want the user to see must be placed on the top 20 lines of the spreadsheet. This does not apply to formulas or tables, which will still be used regardless of where they are placed in the workbook.
Start SpreadsheetConverter by selecting it from the Excel menu
The input cells are the spreadsheet cells that should be converted into input fields on the web page. Input fields are the editable regions of a web page that are used by the user to enter values (in this example the values will be the responses to the survey questions). There are two methods for selecting input cells in the SpreadsheetConverter wizard:
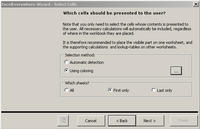
Select which cells the user should be able to edit
Since the example survey spreadsheet that we created contains no formulas, the Coloring option must be chosen:
Input cells are yellow
The layout of the generated web page can be adjusted by changing a number of options found in the Overall Layout step of the SpreadsheetConverter wizard. To modify the standard list of options:
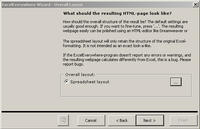
Fine-tune the look-and-feel of the web page
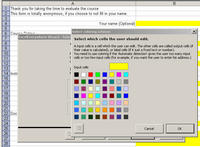
The Cell Formatting step of the SpreadsheetConverter wizard allows you to specify which parts of the spreadsheets cell formatting should be preserved in the generated web page.In the survey example we need to remove the yellow coloring used to highlight the input cells:
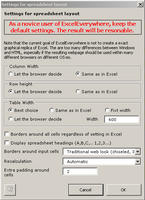
Use the defaults for the layout
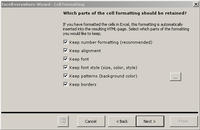
Keep all formatting
What part of the formatting should be kept?
Most users will want to keep the majority of the spreadsheets formatting. However, a web developer, who wishes to make the survey an integrated part of a complex web page, may choose to ignore all of the spreadsheet formatting and instead add the formatting at a later stage using tools like Dreamweaver or FrontPage.
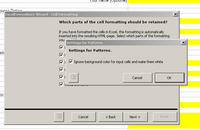
Remove the yellow by saying that input cells should be white
SpreadsheetConverter now has all of the information it requires to convert the spreadsheet into a web page. However, before the conversion can be carried out a name and location must be specified for the new web page:
The web page before we added formatting
The final step of the SpreadsheetConverter wizard is to convert the spreadsheet and generate the new web page:
Now that we’ve created the survey web page the final step is to set up the file to be used in MS FrontPage. However, before moving onto using FrontPage, we’ve made some improvements to the layout of the original survey spreadsheet. The new spreadsheet can be found here.
Leave space for submit button
Note! Notice that some extra space has been created at the bottom of the spreadsheet for the addition of a submit-button.
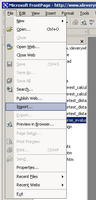
Select File-Import
If the web contains FrontPage themes and shared borders, then use the following instructions to apply them:
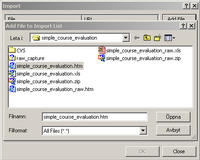
Select the file created by SpreadsheetConverter
Your new page should now look like the other pages in your web site and should also be included within the web’s navigation structure.
Each time a user completes the survey form, the set of answers entered in the survey must be sent to a specified email address. Using MS FrontPage server extensions the addition of an email address to the survey is achieved very easily:
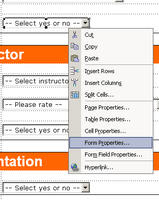
Right click in the form and select ‘From Properties…’
The FrontPage server extensions were originally developed and defined by Microsoft, but are also supported by Apache, a popular web server currently boasting 55% of the market share, (see http://www.netcraft.com/Survey/index-200202.html). The advantage of using the FrontPage server extensions is that you do not need to do any web server programming yourself.
Note! You do not need to have a FrontPage license to use the FrontPage server extensions.
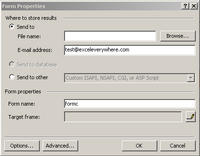
Select ‘Send to’ and enter email address
The final stage in setting up the new survey form in FrontPage is to add a ‘Submit’ button. The submit button will be used by the user to commit their responses to the survey questions. Each time the user clicks on the submit button an email will be sent to the email address that was specified in Step 3. In order to add a Submit button to the survey form perform the following:
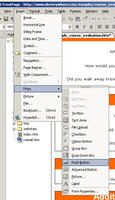
Insert button
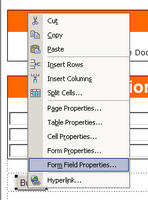
Right-click on button and select ‘Form Field Properties…’
The survey form is now ready to be saved and published.
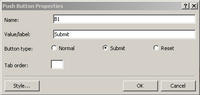
Set button type to submit
Now that the page is fully configured, save the page and then publish the page to your web server.To test that the new page works correctly do the following:
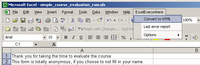
In Step 4 above saw how the FrontPage server extensions automatically generate a confirmation page each time the survey form is used. This page can easily be replaced with your own confirmation page. To replace the automatic confirmation page with your own page, carry out the following:
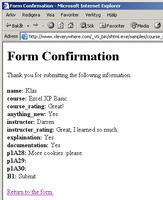
The standard confirmation shows all values entered
Now, when a user clicks on the submit button, the new page will be shown.
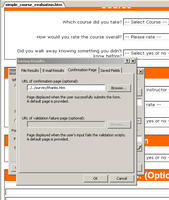
Open form field properties and select confirmation page
Each time a user fills in the form, and clicks on the ‘Submit’ an email will be generated sent to the email address entered in step 2 above. The email will contain all of the information from the survey. An example email can be seen below:
name: Klas
course: Excel XP Basic
course_rating: Great!
anything_new: Yes
instructor: Darren
instructor_rating: Great, I learned so much.
explanation: Yes
documentation: Yes
p1A28: More cookies. please.
p1A29:
p1A30:
B1: Submit
A customized thank you page
I hope you see how easy it is to use SpreadsheetConverter together with the FrontPage server extensions to create online forms. The steps above can be repeated for creating many different types of forms. In this case the original spreadsheet didn’t contain any formulas, but if it had, the steps involved would be exactly the same.
Using the same technique, you can create:
Good luck! Do not hesitate to contact support if you have any problems.
|
||||||||||